Cloud-Native, Modern Solution to 802.1x Network Access Control on Azure AD Devices - Part Two
This is part two in my series outlining how SCEPman and RADIUSaaS can be used to provide a cloud-native, modern solution to 802.1x Network Access Control. If you haven’t read part one yet, please do so first. It’s OK, I’ll wait. In this part, we’ll be walking through the process to achieve the following:
Deploy and configure SCEPman
Deploy and configure RADIUSaaS
Configure Intune to distribute SCEPman certificates, wireless and wired connection policies.
Configure Cisco Meraki APs and Switches with a 802.1x access policy, to direct client authentication to RADIUSaaS
Here are some helpful links that I’ll be referring to along the way:
Deploying SCEPman
At a minimum, SCEPman deployment creates the following Azure resources. I’d recommend putting these resources in their own resource group:
App Service
App Service Plan
Azure Key Vault
Azure AD App Registration
The first step, is creating an Azure AD App Registration and granting the necessary API permissions. This is required so that SCEPman can provide the certificates to devices and also act as an OSCP responder for certificate validation checks. Go ahead and create the App Registration - I called mine “SCEPman”, then once created, make a note of the Application (client) ID. You’ll need this ID later.
Now, go ahead and create a secret. In the App Registration, navigate to the “Certificates & secrets” blade and create a new client secret. I called mine “SCEPmanSecret”. Set the validity to a length you’re comfortable with - and make a note of when it expires so that you renew the secret before then. Make a note of the secret value - this will only show in the portal once and you’ll need it later.
Now let’s grant permissions. Navigate to the API permissions blade of the App Registration and grant the following Microsoft Graph application permissions:
Directory.ReadAll
Now add the following Microsoft Intune application permissions:
scep_challenge_provider
Grant admin consent and you should see a green status for each permission

SCEPman Deployment
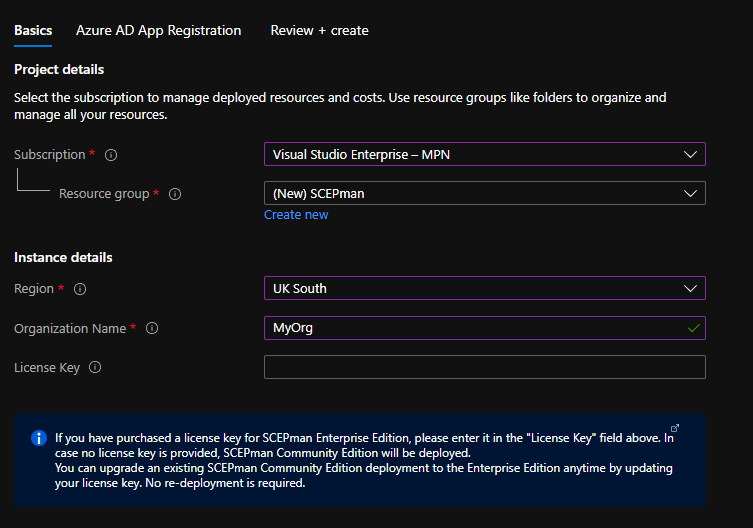
SCEPman has two versions: a community edition and an enterprise edition. I won’t go into the details of the differences between the editions as the documentation explains it nicely. Both editions can be deployed using an Azure Marketplace deployment. Go to the Azure Portal and search the marketplace for “SCEPman” - choose the “SCEPman | Certificates Simplified (Deployment)” offer, then press “Create”
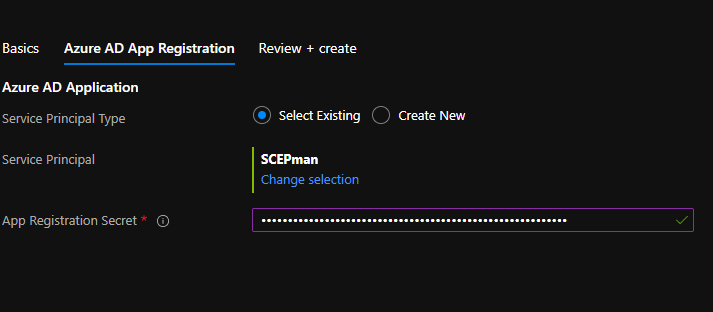
Choose a subscription, resource group and region that you’d like the Azure resources deployed into. Then, provide your organisation’s name and optionally, provide the license key. The license key is not required if you are deploying the Community Edition. Next, you should select “Use existing” to use an existing Azure AD App Registration, then go and find the app registration we created earlier. Mine was called “SCEPman”. Then, provide the app registration secret.
Creating and deploying the SCEPman Root Certificate
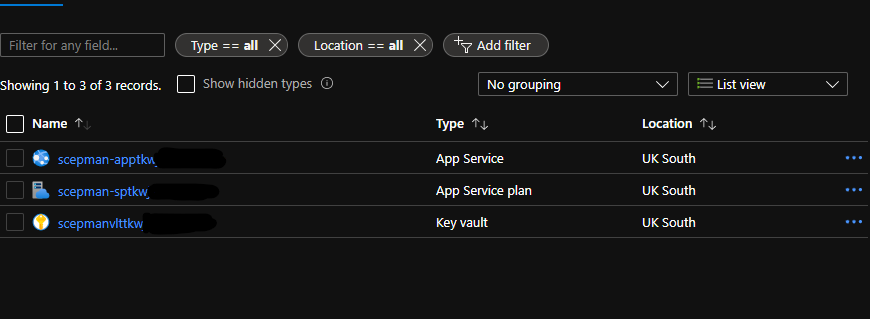
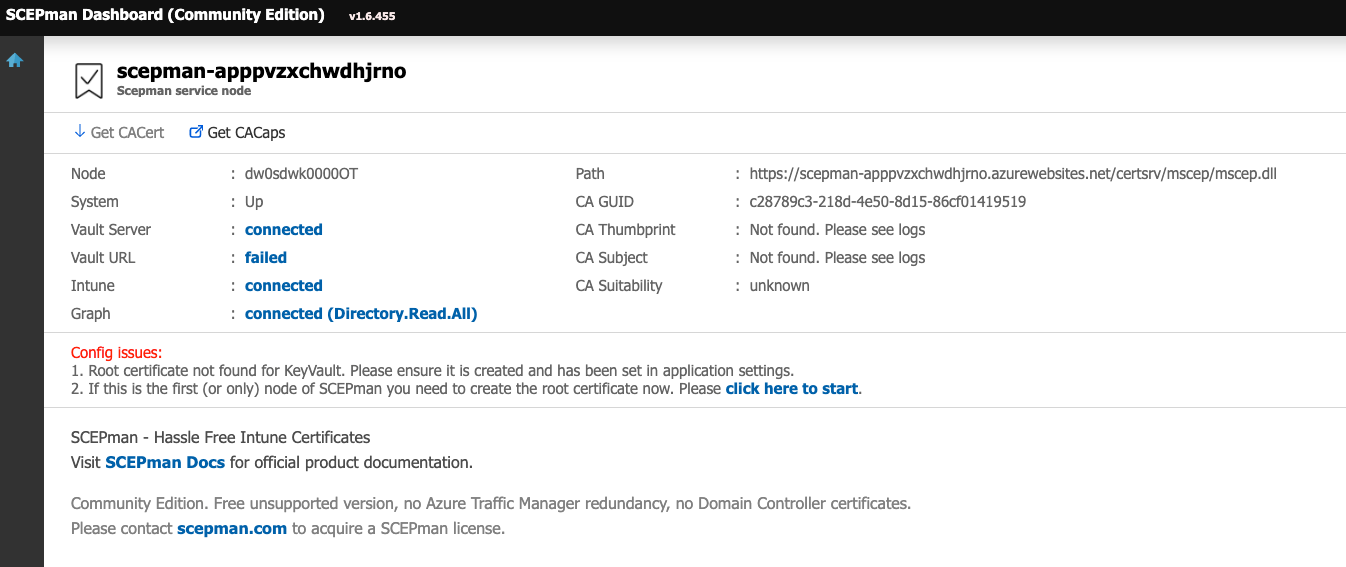
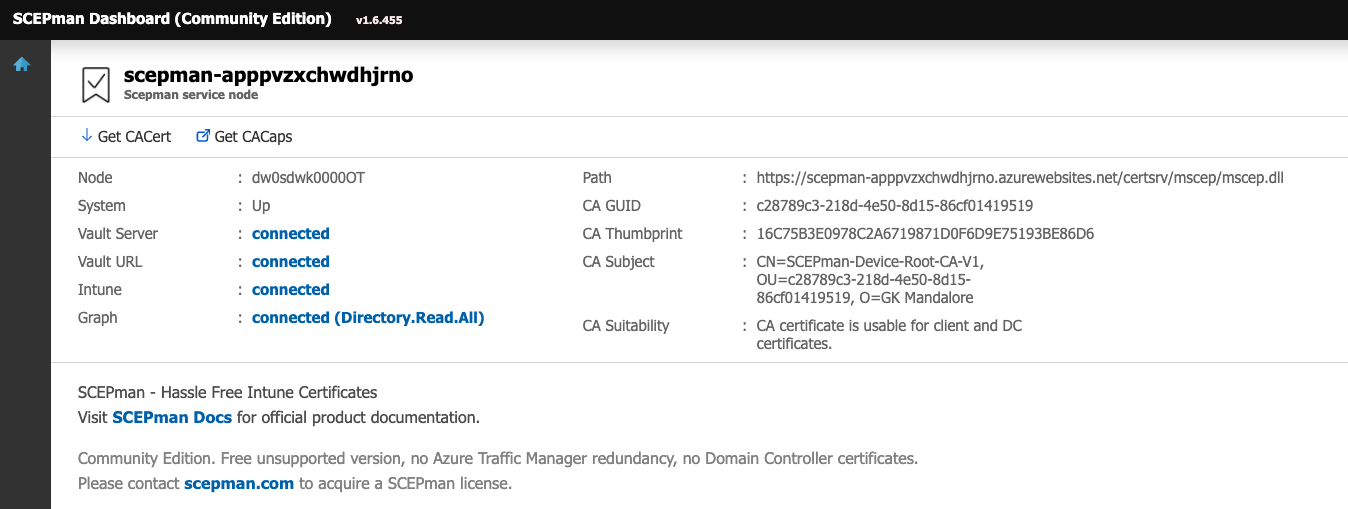
Once the deployment is complete, you should see the an App Service, an App Service Plan, and a Key Vault in your resource group. Navgiate to the App Service and click the URL to access it’s web interface. In this interface, you should see that Vault, Intune and Graph report a status of “connected”.
You’ll notice that the CA thumbprint shows “Not found”. This is to be expected, as we haven’t yet told it to create the root CA certificate. Press “Click here to start”, then tick the box saying that you have read the documentation, and press Create first node. After a short amount of time, it should complete and you can refresh the page. You’ll see the Root certificate is now available. Press the “Get CACert” button, to get the root CA cert in .cer format. Save this, as we’ll need it in a second.
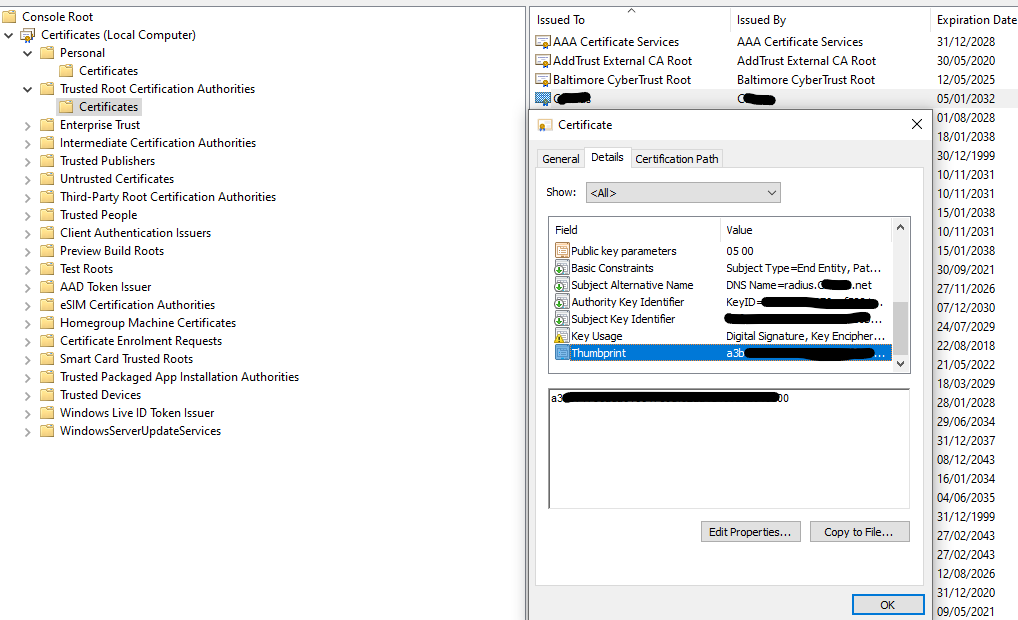
Now that we’ve got the CA up and running, it’s time to distribute it as a trusted root CA to our Windows 10 devices via Intune.
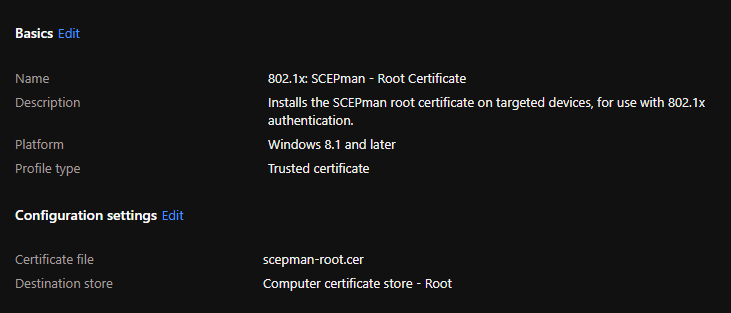
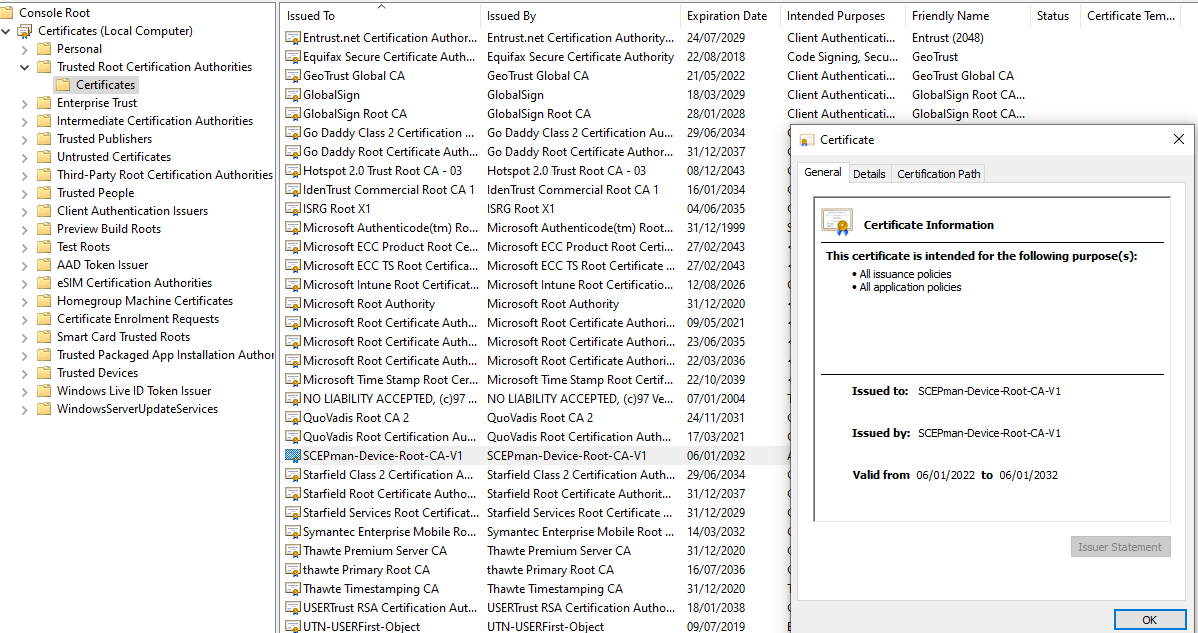
Navigate to Microsoft Endpoint Manager. Create a new configuration profile, use the “Templates” as the profile type, and use the “Trusted certificate” template. Provide a name, then in the configuration settings, upload the .cer file you downloaded a few seconds ago. Set the destination as “Computer certificate store - Root”, then press next and assign to a group. Once your devices sync with Intune, they’ll receive the certificate. You can check on a device by navigating to the local computer certificate store and viewing the trusted root certification authorities.

Deploying the SCEP profile to force devices to retrieve their own certificate from SCEPman
Now that our devices trust the SCEPman CA, we need to configure them to use SCEP to get their own certificate. This certificate will be used to authenticate.
Navigate to Microsoft Endpoint Manager. Create a new configuration profile using the “Templates” as the profile type. Use “SCEP certificate” template. Provide a name to the profile. Configure the profile as outlined in the below image. Change the “SCEP Server URL” to your SCEPman URL. You can find this by navigating to the SCEPman App Service. The format for the URL is:
https://sceman-app<randomchars>.azurewebsites.net/certsrv/mscep/mscep.dll

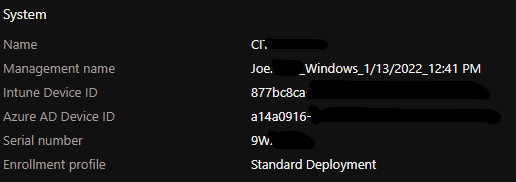
Once done, assign the profile. After the device synchronises, you should see a certificate for the device. The certificate CN will be the Azure AD Device Object ID of the device.

Configuring RADIUSaaS
As mentioned in Part One, RADIUSaaS is a cloud RADIUS system. At this time, it runs in Azure Kubernetes in a subscription hosted by the vendor. It uses Azure AD authentication to access.
Once you’ve got access to the RADIUSaaS portal, the first thing you’ll need to configure is the deployment of the RADIUSaaS root certificate to your devices, in the same way we did with the SCEPman CA certificate - this is so that the devices trust the RADIUS server. Within RADIUSaaS, navigate to Settings>Server Settings and download the “Servercertificate”. The CN of the certificate will be your organisations name.
I won’t run through the process to deploy a trusted root certificate for this, as it’s the same process we performed for SCEPman root certificate.
The next step is to upload the SCEPman certificate to RADIUSaaS. This configures RADIUSaaS to accept client certificates issued from this root certificate. Navigate to Settings>Authentication Certificates>Add. Select SCEPman URL from the drop-down list, and enter in the URL.
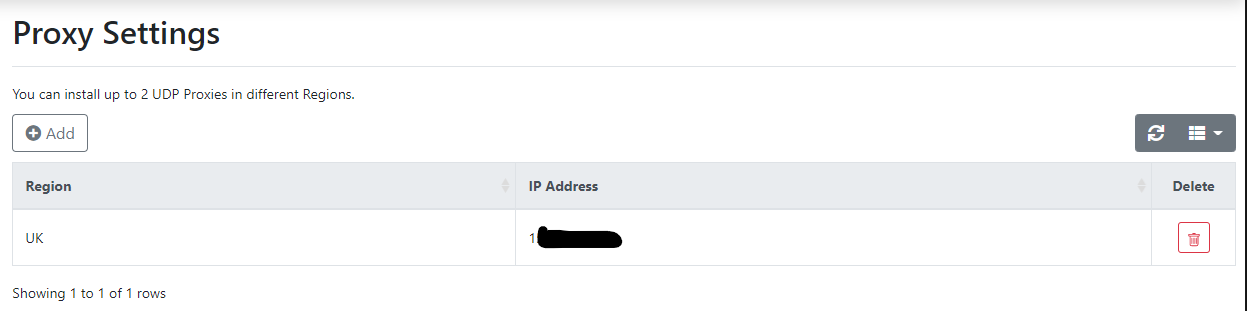
Depending on your network infrastructure, you may need to setup a proxy. By default, RADIUSaaS supports RadSec. As I’m using Cisco Meraki - we’ll need to create the proxy so that we can use the RADIUS authentication port of UDP/1812. To do this, go to Settings>Proxy Settings>Add>Select your region. It’ll take a bit of time to complete, but once complete you’ll see the IP address. Make a note of this, as we’ll need it when we configure the 802.1x access policy.
Now that we’ve completed the configuration for RADIUSaaS, let’s move on to creating the Wi-Fi and Wired connection policies in Intune.


Deploying Wi-Fi and Wired 802.1x Connection Profiles to devices
Let’s start with Wi-Fi.
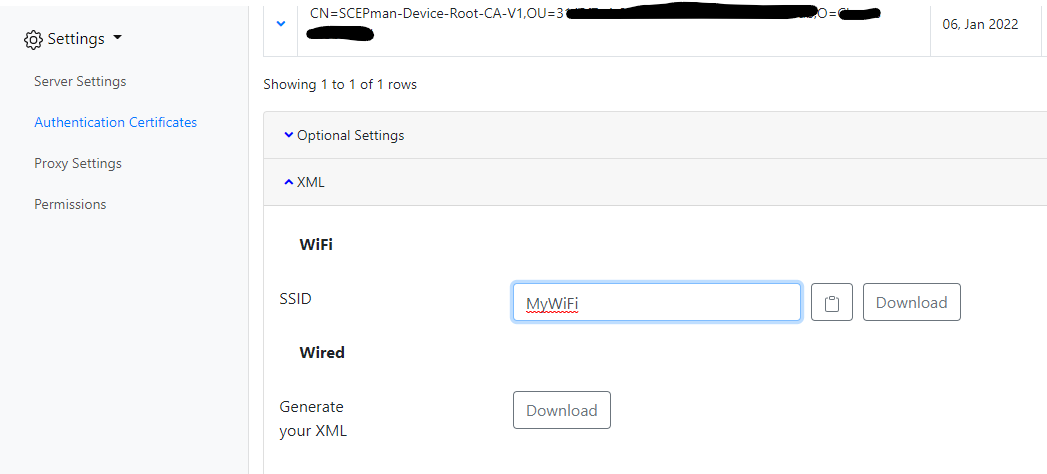
To retrieve the Wi-Fi XML, go to RADIUSaaS and navigate to Settings>Authentication Certificates>XML
Under WiFi, enter the name of the SSID. The SSID doesn’t need to exist yet, but does need to match whatever you’re going to be naming the SSID. Then, press “Download” and you’ll receive an XML file.
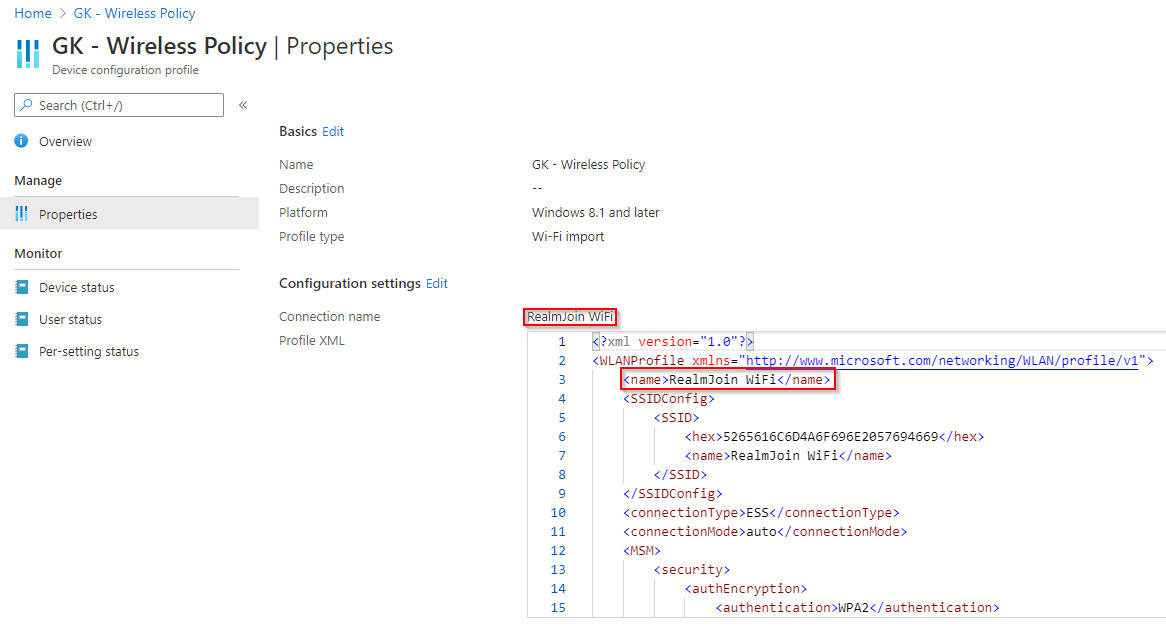
Navigate to Microsoft Endpoint Manager and create a configuration profile. Provide a name, select the platform as Windows 8.1 and later and then select a profile type of Wi-Fi Import. Provide the SSID name as the Connection name value, then enter in the XML. you may need to modify the XML name, to ensure it matches the name of the SSID. Assign the profile to your devices.
Moving on to Wired.
We also need an XML here, so grab the XML from the same place in RADIUSaaS, but this time press “Download” under the “Wired” section.
Back in Microsoft Endpoint Manager, let’s also create a configuration profile. Provide a name, using Windows 10 and later select a profile type of “Custom”. Add an OMA-URI setting with the following values:
Name: Modern Workplace-Windows 10 LAN Profile
OMA-URI: ./Device/Vendor/MSFT/WiredNetwork/LanXML
Data Type: String (XML File)
Upload the XML file downloaded from RADIUSaaS, then save and assign the profile.
At this stage, the devices have their certificates, they trust both SCEPman (the CA) and RADIUSaaS (the RADIUS server). Now, we’ll move onto creating an 802.1x Access Policy for wired and wireless connections. I would suggest you do not continue with the next step until all devices connected to the wired/wireless network have received the profiles we’ve created throughout this process. There should be a total of 5 configuration profiles:
SCEPman Root CA (Trusted certificate profile type)
SCEPman Device Certificate (SCEP Certificate profile type)
RADIUSaaS Root CA (Trusted certificate profile type)
802.1x Wired Settings (Custom profile type)
802.1x Wireless Settings (WiFi Import profile type)

Configuring the 802.1x Wireless Network
For this demonstration, I’ll be using Cisco Meraki. If you’re using a different vendor, the steps may vary and I’d encourage you to review the RADIUSaaS Docs.
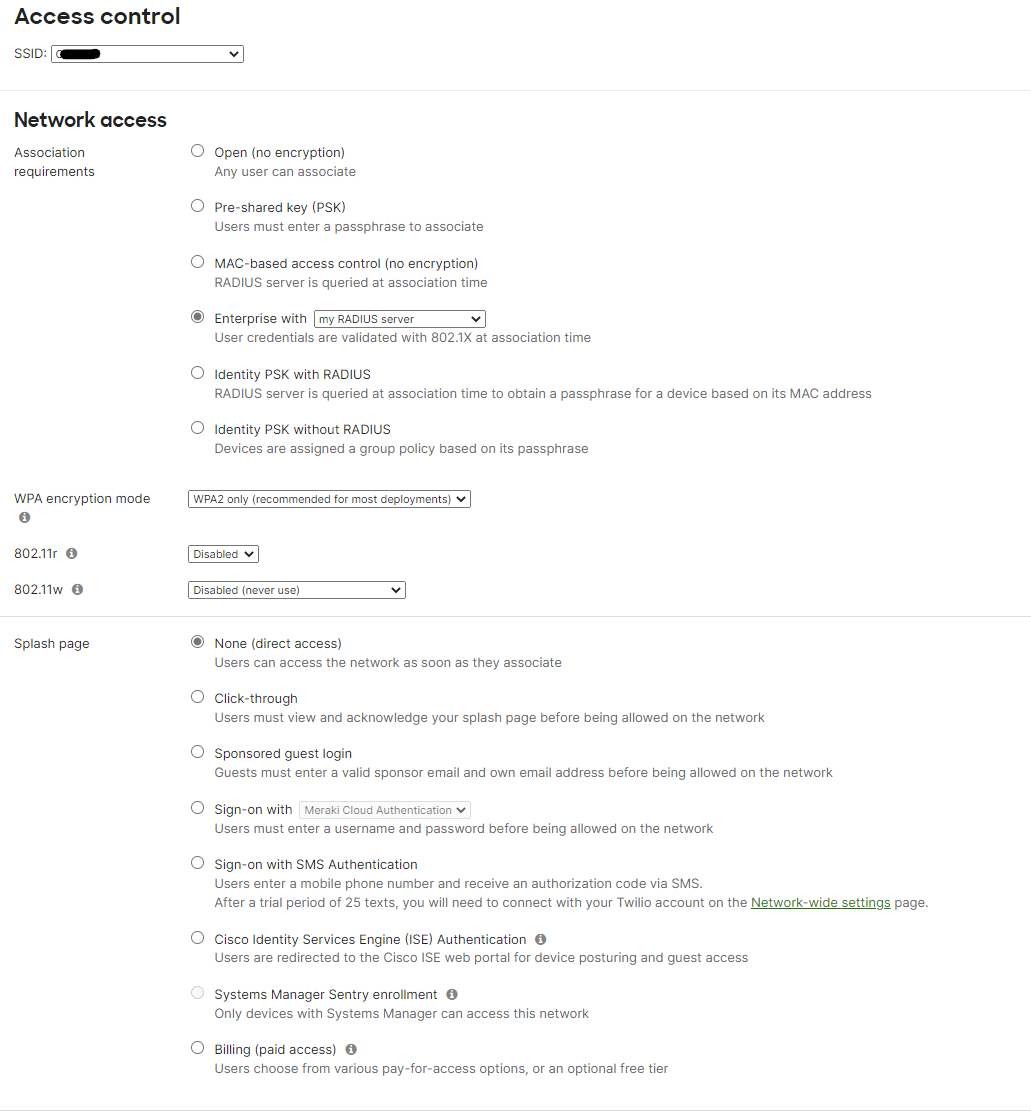
In the Meraki portal, navigate to Wireless>SSIDs>then edit or create your chosen SSID. Use the following settings:
Association requirements: Enterprise with my RADIUS server
WPA encryption mode: WPA2 only
802.11r: Disabled
802.11w: Disabled
Splash page: None
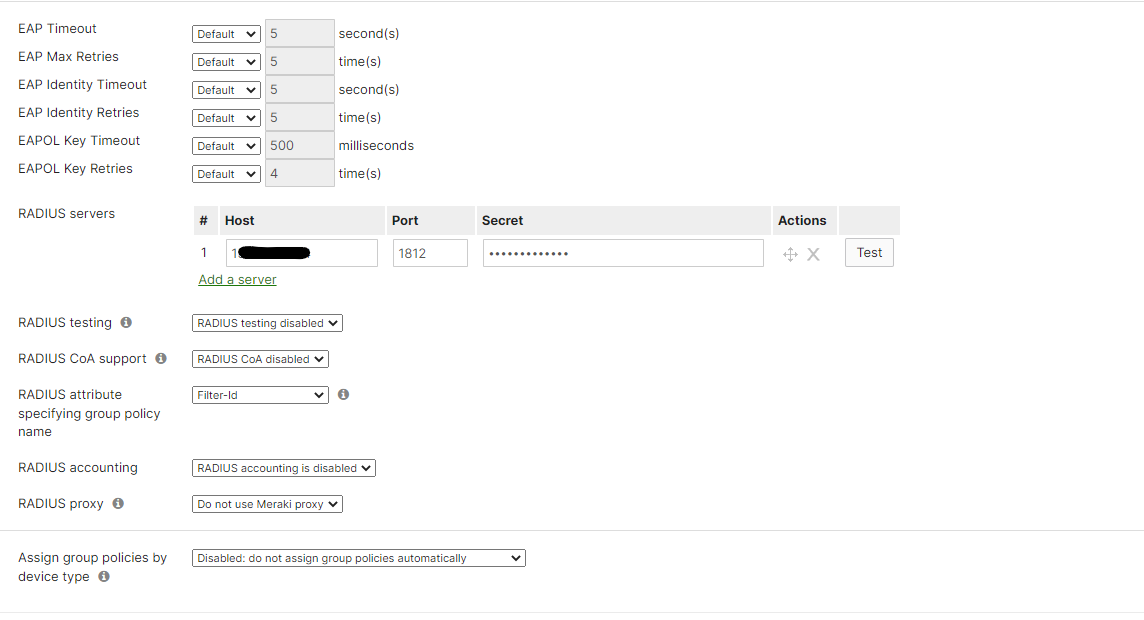
All EAP entries: Default
RADIUS servers: Enter the IP of the RADIUSaaS proxy server, and the secret.
RADIUS testing: Disabled
RADIUS CoA: Disabled
RADIUS attribute: Filter-Id
RADIUS Accounting: Disabled - or enabled, up to you.
RADIUS proxy: Do not use Meraki proxy
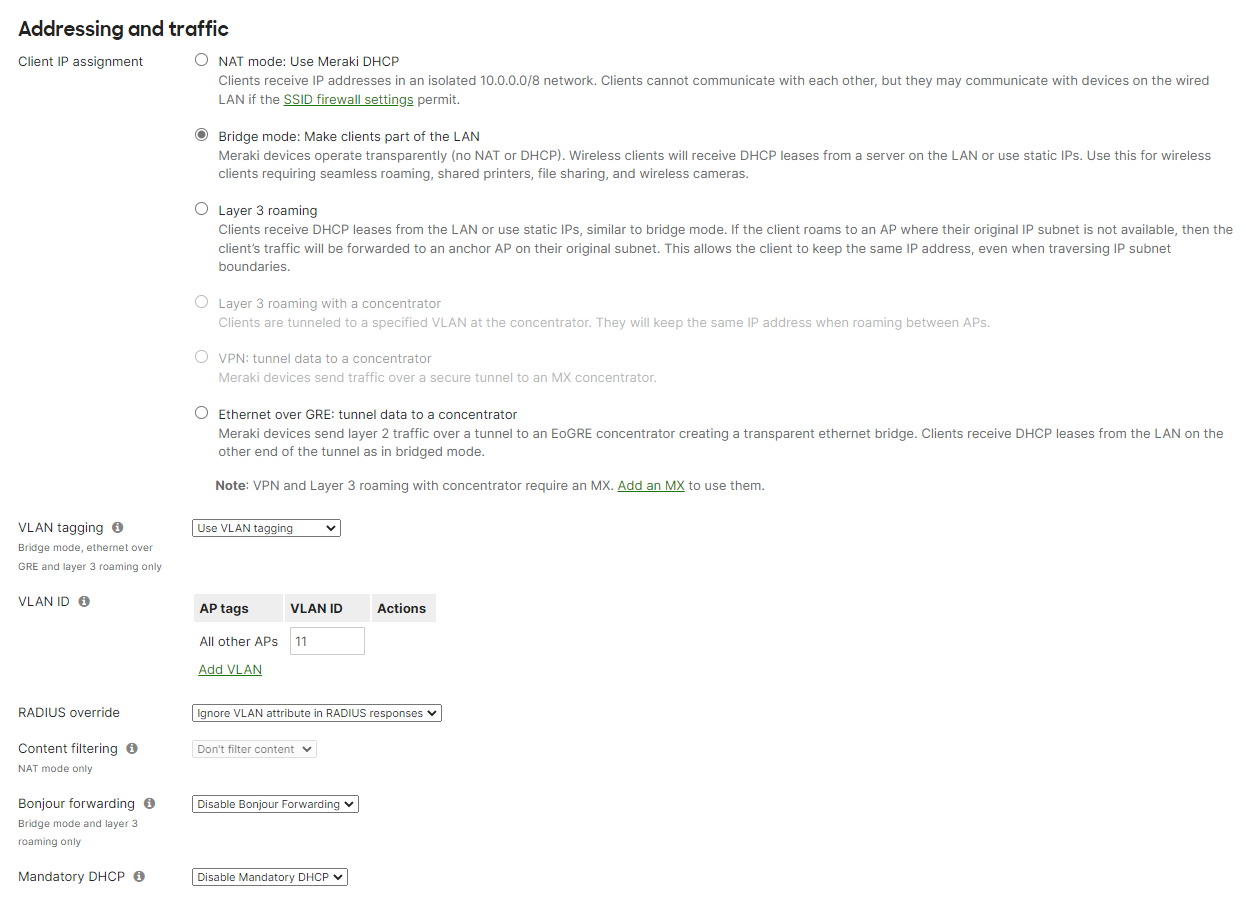
Client IP assignment: Bridge mode
VLAN tagging: This is environment specific, this is enabled for my environment, with the VLAN ID configured.
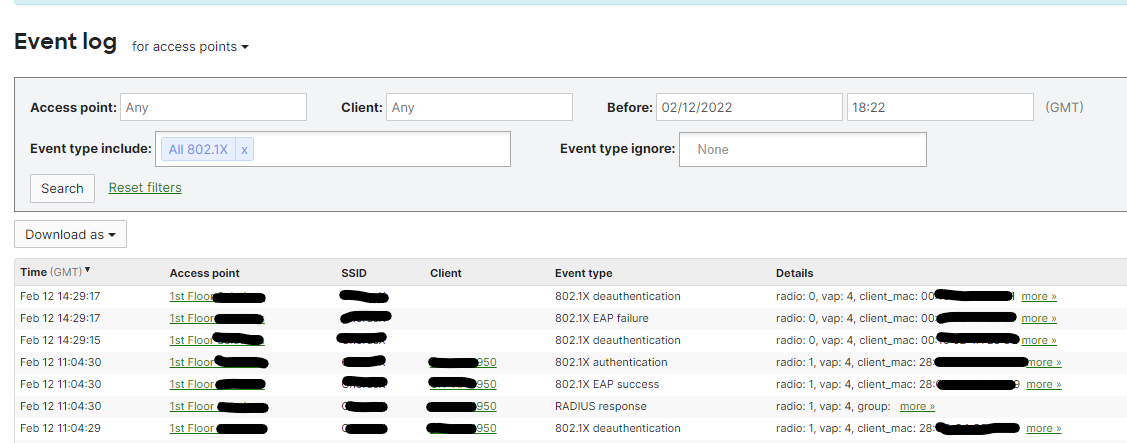
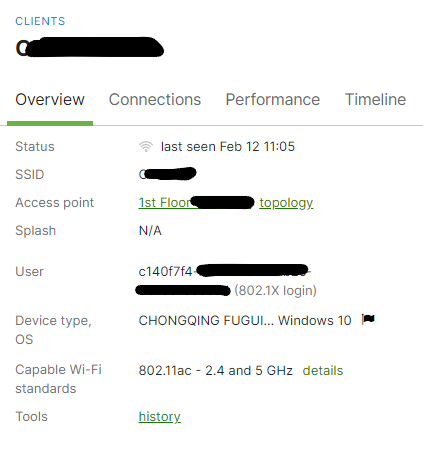
Once this is done and saved to the APs, your devices should start associating with the SSID and performing 802.1x authentication. You can view this in the Meraki event logs, and also on the client page.
Configuring the 802.1x Wired Network
Once again, I’ll be using Cisco Meraki for the configuration of this.
In the Meraki portal, navigate to Switch>Access Policies and create an access policy. You’ll want to review the Meraki documentation to confirm the Host Mode type. In my environment, we need to use Multi-Auth but yours may be different. The settings, as you can see, will be very similar to the wireless settings.
Once configured, you can test in the same method as with wireless clients.
Summary
Pat yourself on the back if you’ve got this far - hopefully you’re now reaping the benefits of a cloud-native, modern solution to 802.1x. You no longer have to manage AD CS and NPS servers (at least not for NAC!), and can be confident that access to your network is secured using certificates, from a cloud-based CA backed by Azure Key Vault.
If you have any questions, as always, feel free to leave a comment and I’ll get back to you as soon as I can.